Tagging Points & Histories
Point Tags
Tagging your points in your station should be done in accordance to the Project Haystack standards listed in their tag documentation. The basic method involves right-clicking the point you would like to tag in the Niagara tree and selecting "Edit Tags". From there a user can open and search the Haystack tag dictionary (click here to learn how to add if it does not show up for you) and add the appropriate tags for each point.
Minimum Requirements
The following are the minimum requirements for tagging points and histories. However, we recommend following the full haystack standard which allows more advanced querying (for example, querying for site meters).
| Points | Histories | |
|---|---|---|
| Tags | hs:point hs:kind | hs:his n:history hs:kind |
| Relations | hs:siteRef | hs:siteRef |
Tagging with the Program Service
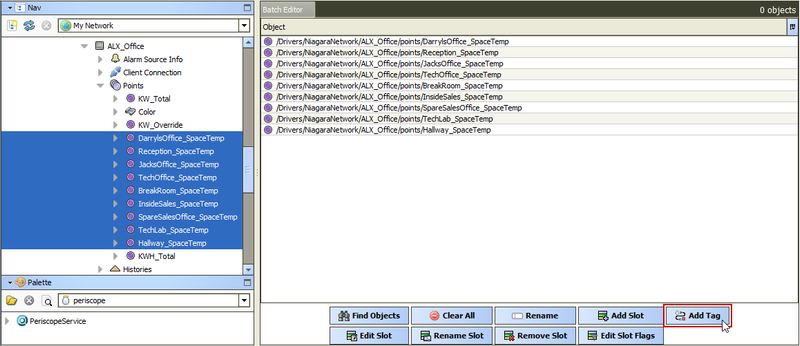
To add tags in a batch method, a user can utilize Niagara4's Program Service (Station > Config > Services > ProgramService). In this service, points can be selected in groups, dragged and dropped into the Program Service Batch Editor pane, and then batch-tagged by selecting the "Add Tags" button.
Point Tagging Standards
Below are links to Project Haystack tagging standards for common point types to help ensure you are using the correct tags on your points:
In addition to point tagging, "equip" tagging is also extremely useful and necessary for creating proper references between the points and their respective equipment. Click here for more information on tagging equipment.
Using the "disMacro" tag
Do you have a lot of energy trends all with the same name like "kWh"? Try batch-adding the "disMacro" tag to your points.
disMacro uses $ to define template parts, so if you wanted your point to display the equipment name followed by the point name, you'd set your disMacro (String) tag as: "$equipRef $navName"
Haystack Cache
When a user updates tags or other items in the station, they should navigate to Station > Config > Services > PeriscopeService > Haystack Cache, right-click on "Haystack Cache" and choose Actions > Load Cache. This will force the load of any recent Haystack tags that were applied on the station, and ensure that Periscope will show that data appropriately as well.
Niagara Proxy Points
By default, proxy points (those imported to a supervisory level from a remote device) in the Niagara Network lose all tags that were defined in the remote station (typically a JACE). This is especially problematic when dealing with points that may contain a history that's also imported. Starting in Niagara 4.2 you can now keep specific tags, including history tags.
To force an import of these tags from your remote station, navigate to the property sheet view of the Niagara Network and set "Persist Fetched Tags" to true. This will cause any dynamically fetched tag to persist on the proxy point. To force a sync, right click on the Niagara Network and click Actions > Force Update Niagara Proxy Points. 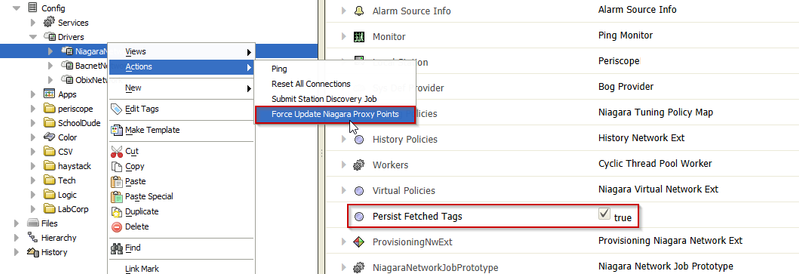
This forced update will look at each proxy point, check to see if a matching history is being imported, and add the appropriate history tags (typically n:history and the string value of the history's ord). If executed properly, your data points should now have their corresponding imported histories automatically identified and defined for you, as shown in the graphic below.
Implied History Tags
Manually Adding Histories (Niagara)
Sometimes a station may have histories that are created outside of a normal history extension, which causes it to lack the appropriate history tags. These types of trends can be manually added to the Haystack database by creating a new component and tagging the history appropriately. For example, let's assume a trend was imported from a .CSV file located at /Weather/CharlotteOAT. To add this to Periscope:
- Create a new Component (or Folder) called CharlotteOAT
- Open up the Property Sheet
- Drag the "HistoryTags" component from the palette into the property sheet
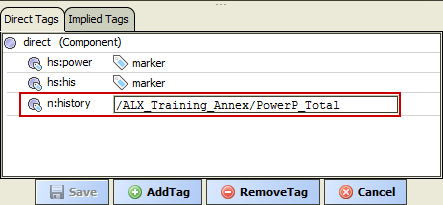
- Set the value of "n;history" to the path to the history (case-sensitive) like "/Weather/CharlotteOAT" for a history CharlotteOAT on the Weather history device
- Change the value of "hs:kind" to "Enum" or "String" if appropraite (this tag will not be created if you are using a control point).
As with regular histories, manually added histories also need a kind and siteRef tag. Kind is typically a string tag "Number" and the siteRef associates it with the site the trend belongs to. Since licensing is done by site, ensure the site referenced is enabled in the license via "Choose Sites".
The siteRef tag may be added via the Database settings view but kind must be added natively via Niagara or Skyspark.